Wednesday, December 29, 2010

Holiday update

I left you with an image of burnt cookies and a rather minimalist Christmas vignette, but rest assured that the holiday has been a warm and happy one. Everything went by the same procedure as every year, what with family get-togethers, Christmas dinner, presents and all. It just went all too fast, and I have had two days back at work already, but now there's no more work until next year... Yay!
This is the bag I made for my middle sister. She had made more granny squares than she needed for an afghan, and handed me the remaining six a while back, hinting that they would look great on a white linen bag. I feigned indifference and promptly forgot about it. It resurfaced a while before Christmas and I set to work. I stitched the panel to a piece of linen and added a heavy interfacing to the back. I didn't use a pattern, just gave the bag pieces a bit of shape with my rotary cutter, tapering the sides and rounding the corners before stitching it together.
I had this sweet cat print in my stash and it worked out great for the lining and an inner pocket. I was going to add a magnet button, but it mysteriously disappeared before I got to sew it on. It has not resurfaced yet, so what ever happened to it, I don't know - and no, it is not trapped between the bag and lining!
Anyway - there were tears on Christmas eve, and not because she hated it - my sweet sis claimed to be the luckiest girl in the world, so it seems she liked it!
And by the way, I got the same reaction to the Austen angel, so yes, Christmas was a success as far as I'm concerned!

Friday, December 24, 2010

Saturday, December 18, 2010

Progress

Well, it didn't seem so at first - I managed to burn my first batch of gingerbread cookies. I blame the timer. I have never before managed to fill two trays with dough shapes while the first one was still baking, and it suddenly occured to me that something was wrong. I had to go by the wall clock for the next two trays or they would have been burnt too. So what's a girl to do? I called my mum. And told her I want a new timer for Christmas ;-)
The rest were better though, and the taste is just right.
There was also time for a bit of sewing. If all goes according to plan I'll have all the presents finished by the end of tomorrow. Not too bad...

Friday, December 17, 2010

Angelic

Meet Mary Bennet, one of the younger Bennet sisters... I have made an attempt to make a Jane Austen angel from the Tilda book Sew Sunny Homestyle. I have been wanting to make this for a while, and when my little sis said she wanted one, I thought it would make a nice Christmas present for her.
I didn't have time to order fabric for her skin and used some pale pink cotton I had in my stash instead of the tan fabric Tilda uses. Combined with white for the dress, she became rather pale and listless, and my choice of yarn for her hair makes her look a bit dishevelled. Well, she is very bright, and plays the piano beautifully, although she is a bit of a show-off. She might be joined by one of her prettier sisters at a later date, but not in time for Christmas, though.
I didn't mean to be too harsh with poor Mary - being breathtakingly beautiful isn't all it's cracked up to be, and she is a strong and handsome young woman with a lot going for her.
And she has very pretty purple wings.

Monday, December 06, 2010

Birthday cape

The pre-holiday calm is still here, and I have spent most of my time this weekend doing chores, hanging out with friends and reading instead of getting ready for Christmas. So the panic might yet strike and send me into a frenzy of shopping and baking, but so far so good!
It probably helps that I haven't planned on making a lot of homemade presents this year, so there's no stressing by the sewing machine. In fact it has been so cold lately that spending time in my sewing area (which is in a corner of my bedroom and hence not too warm) is not very tempting. I might have to set up a work station in the kitchen to get anything done.
I have managed to sew this cape though. When my sweet little sis asks, I find I cave in every time and make whatever she wants. She works in a kindergarten, and this time the request was for a cape for the kids to wear when it's their birthday. I didn't have a pattern, so I just winged it, adding darts at the shoulders and back to avoid a lot of fabric bunching up at the neck. I wanted something that would work for both boys and girls, so I made it reversible. The blue fabric with silver stars adds enough magic for it to double as a magician's cape for playtime as well, and the red and white hippo fabric (Ikea)adds a bit of fun. I just hope they can use it! (They'd better...LOL).

Sunday, November 28, 2010

First candle

I'm feeling sooo together right now. For the first time for years I have actually managed to get my advent decoration sorted and the first candle lit on the day without being all stressed out about it. I'm enjoying some quiet time indoors on my own with that first candle flickering gently next to me, a cup of cappuchino and my laptop, getting ready to do some blog reading and then I'll start sorting out my Christmas lists. But I have such a feeling of calm about it all this year. Christmas will come one way or another, and I don't really have to make a lot of fuss. I have a little bit of baking to do, and I have one party to arrange, but that's all really. The presents won't take care of themselves, but I know that with careful planning the actual shopping will be done in a few hours, so there is really nothing to fuss about. Now if this calm only continues into December I'll be fine...
I love my advent decoration this year - a little moss covered landscape with candles. I added a strip of paper with (slightly wonky) numbers around the edge. The idea was to have a Santa or snowman magnet to move along from day to day, but all the holiday stuff is still up in the attic, so I just grabbed a magnet from my fridge door for now. I like the effect, though - it could be a door into a secret garden, perhaps? Maybe I need some little gnomes and red mushrooms peeking out from under the moss hills...

Saturday, November 27, 2010

Holiday prep


buttonstar
Originally uploaded by crafty mathea
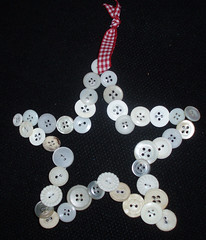
Less than a month until Christmas - where did this autumn go? To get myself in the right mood for holiday crafting I started off with this little star. I have a stash of old buttons inherited from my seamstress aunt, and this was a fun project where I got to use a lot of them. I made a star shape frame from heavy gauge wire and used thin wire to "sew" the buttons onto the frame. A nice and easy project that I finished in an evening while watching a movie.
Now, if all my craft projects were as quick to do, I would be ready for Christmas with time to spare...
Right, duh!

Wednesday, November 24, 2010

Harvest quilt

It's about time I showed my Harvest quilt, isn't it? Tada! I actually finished it a couple of weeks ago, but the weather has been awful, so I have been waiting for a clear day to be able to take some pictures, and today, being at home in the middle of the day I finally got the chance to hang it up and start snapping. In order to take the photos I have to move the sofas and the table out of the way, which led to quite a bit of dusting and hoovering as well, so what was meant to be a relaxed day by the sewing machine ended up quite busy, but tomorrow is another day...
Now, this is not a different quilt. It is the back of the Harvest quilt actually. I couldn't decide on what to use for the backing, and I had an idea in my head while I was working on the front that I would include some turquoise - like glimpses of water through autumn foliage, but I just couldn't make it work. So I made the background all "watery" instead. To create a bit of interest I made a few star blocks to blend into the background.

I have spent quite a lot of time quilting this thing. Inspired by Boo Dilly's lovely quilting I went with alternating lines of machine and hand quilting, dividing the quilt into quarters - two with horizontal lines and two with vertical lines. After washing the quilt got a lot of texture, and up close it looks like furrows in a field. Combined with the lovely fabrics with prints of onions, mushrooms, corn, cauliflower, leaves and chrysanthemums the name was obvious - this just has to be the Harvest Quilt! I just love the texture that the heavy quilting has added, and it is so soft and snuggly. Just right for cold autumn evenings. This one will definitely not leave the building ;-)

Saturday, November 13, 2010

More mug rugs

I don't seem to have much to talk about lately, and I'm way behind in visiting blogs and taking part in whatever's going on. I joined the Bloggers Quilt Festival, but must admit that I have yet to make the rounds and see all the fabulous quilts. A combination of cold weather (I'm so not a winter person...) and stress at work has left me with little energy for any extras. Computer problems have added to it all. I have treated myself to a laptop now, though, so once I get everything transferred and set up the way I want, I should be back on track.
Huddling under a pile of quilts in a quiet corner has helped me get some work done, however. A quick dash into a chilly sewing room to quilt a few wavy lines here and there, followed by some cosy hand stitching means that I have finished a few things. My Lonnie Rossie/Autumn/Harvest quilt (name pending) for one. I'll try to fit a photo session in tomorrow during those precious few hours of natural daylight, so I can show it off. Meanwhile, here's a picture of some more mug rugs I made from bits and pieces in my scrap bag. Have a closer look in my Flickr album if you like!

Monday, November 01, 2010

Sunflowerquilt


Sunflowerquilt
Originally uploaded by crafty mathea
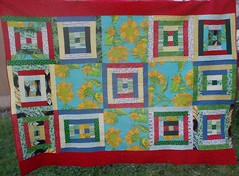
I've decided to show my Sunflower quilt for the Bloggers' Quilt Festival this time around. This is one of the quilts I have made that I have actually managed to keep for myself. I found the pattern in the first Material Obsessions book and thought it would be a good pattern to show off the lovely Sole Sunflower fabric by Valori Wells. I had been hoarding this fabric for a while and been reluctant to cut into it, but with 18" blocks I got to show off the lovely sunflowers. Once I had managed to pick the rest of the fabrics, the blocks went together easily enough, but I had a hard time choosing fabric for the border, and auditioned several choices on Flickr and got lots of help before finally ending up with the red fabric.
I think one of the reasons this quilt feels special to me is that I got so much input from my internet friends and that really made all the difference. I really got the sense of being part of a community who helped and cheered me on.
The quilting took ages. I used quite a lot of free motion quilting on the sunflower blocks, and straightish lines on the strips of the courthouse step blocks. I regretted my choice of quilting more than once, because it seemed to take ages, but I got there eventually. After washing the quilt became very soft and crinkly and remains my favourite nap quilt.
More photos of the quilt here.

Friday, October 22, 2010

Look what just arrived!


spoonflower order
Originally uploaded by crafty mathea
My order from Spoonflower just arrived and I'm just so excited! When Heather Ross announced on her blog that she had some new fabrics available on Spoonflower for a short while, I knew the time had come to take action. I had been playing with my own design for a while, but decided to just test go for it and order a yard along with some favourites from other designers. I'm using the word "designer" with tongue firmly placed in cheek as it applies to myself. All I have done, after all, is list some of the bus stops along my local line from my time in London way back.
I have mentioned earlier my fascination for those bus destination blinds that have become so popular. They have proved to be very hard to come by, and I also realized that a full length bus blind would be difficult to hang in a small flat.

Then I came up with the idea of making my own in miniature. I googled the #72 bus to get the names of all the bus stops, and edited the list firmly to get a workable format. I got a bit impatient, otherwise I would have tweaked my picture file a bit to get a full repeat, but there you have it. On my 1 yard sample I get four full lists and four with the first three stops missing, but never mind, that will do for now. I want to make a wall hanging with one, maybe a pillow and a shopping bag, and the rest might just be cut into pieces and used here and there. But I guess I will be ordering more. I might work with the design, maybe go for less of the black background and get two full repeats to the yard. A friend of mine wants curtains from this design, so I might just make it available for sale if there is any interest after my tweaking, we'll see.
And I also got some beautiful designs from others - go to my Flickr photos to get details and links to the other designs.

Sunday, October 17, 2010

Big block

My first block for the new quilt is finished and it is huge! 22" in fact. I am really not used to working on such a grand scale, but at least I get results rather quickly. In fact, once I had finished this one, it didn't take me long to piece the first seams of the rest of the blocks. There are only six blocks, after all. I'm chain piecing, and stitching as many seams as I can on each block before pressing, so it shouldn't take me long to finish the rest. I quite like the effect of these big pieces - you really get to see the beautiful patterns on all the fabrics this way. After a while where I just didn't feel like sewing at all, it seems like my sewing mojo has returned and my head is bursting with ideas. I have so many new plans that I really need more hours in the day to make them all happen.
I'm also working on that fruit tablecloth and there is that pile of batting for mug rugs to begin to tackle. A bag for my laptop and two finished quilt tops ready to be quilted, well, I certainly have enough to do in my spare time! And I haven't even begun to think about Christmas...

Saturday, October 16, 2010

Colour and shape

I went into a bookstore to get a birthdaycard yesterday and as so often happens, I came away with more than I had planned on buying. No books this time, but somehow I just "needed" these bookmarks. Marketeers really know what they are doing, don't they? If these bookmarks had been grey, it would never have occured to me that I needed them, or even if they all were just one colour. A set of eight purple bookmarks? I might have glanced in their direction, but that's it. But the fact that you get a veritable little rainbow of colours? Draws me in every time! I have bought document folders, binders, paperclips, envelopes and of course crayons and pens more times than I care to remember just because they were available in "every colour", and of course you always need the full set...
Not that it is a big deal or anything, just an observation. And look, these are really sweet - I just noticed that they look like little houses! Maybe I can use them as inspiration for something quilty ;-)

This little guy came home with me as well. Luckily they only had him in one colour or I would have come home with a whole family of them. But he is such a clever little chap, that it might even have been a good idea.
Look what he does. He is a book-holder. I always find it a bit difficult to use instruction manuals and the like while working on the computer, but this guy helps. Not only does he hold the book open, but the book can actually stand open on the table next to the computer as well so I can work through the lessons using both hands on the computer and not have to keep propping the book open. Not such a bad day of shopping after all!
I resisted the sweet little clip on lamp to place on the top of your book, but come to think of it, my computer corner can get a bit dark...

Sunday, October 10, 2010

More new plans

I found it! The power switch on my sewing machine, that is ;-) My fruit blocks are coming together and I have started planning a new project. This is my EQ sketch of the new quilt I just started cutting pieces for. The blocks are from the Fat Quarterly blog and they will be huge. 20 x 20 ". I never work that large, but I wanted the different fabrics to be allowed to shine, and big blocks seem to be the way to do it. We'll see how it looks once I get started piecing them together. This will be a lap quilt for my youngest sister who is a bit of a minimalist. Her living room is all neutral: black, white, gray with just some little hints of colour, so I had to run my colour choices by her. I sent her a photo of the pile of fabrics via my mobile asking if these were colours she could live with. The answer was positive, so now she knows I'm up to something. Well, it doesn't hurt to have her wait a while to see excatly what is going on :-)

Wednesday, October 06, 2010

Maybe some sewing?

I've been a bit stuck lately. Mountains of fabric surround me, my rotary blade has been sharpened, but I haven't felt up to cutting into fabric. Until today, that is. The plan was to go to a guild meeting, but horrendous weather made it very tempting to stay in, and since I was in a quilty mood anyway, I got some fabric out and started cutting. These fabrics have been lying in wait since early spring. I had meant to make a summery tablecloth, but it never happened. Well, there will be other summers... At least I'm feeling inspired to sew.
Now, how did I turn that sewing machine on...?

Thursday, September 30, 2010

Climbing quilts

Not much sewing going on here recently, I just can't seem to get my act together and get started.
But I haven't been totally idle - I have painted my quilt ladder to match my book shelves. Ah, much better! Now perhaps the teddies' bench next... Or should I go quilt something...?
Paint or quilt, that's the question...

Or maybe just sit here until the urge to do something goes away...

Sunday, September 26, 2010

Mug rug bug

There's a new bug in blogland - and it's called the Mug Rug, When I caught on, there was already a swap going on, but being late for that didn't stop me - I thought this was such a great idea that I couldn't wait to make my own. So what is a Mug Rug? Well, from what I gather it is a tiny quilt, smaller than a placemat but larger than a coaster. Just the right size to place your tea or coffee mug and a couple of biscuits on . I thought that was just brilliant! I tend to see it as a bit of a waste (meanie that I am...) to set the table with plates when all I have to offer is a biscuit or cookie, and with impromptu visits that's often the case. There doesn't seem to be cake or pie loitering around in my larder for those unexpected visits, most of the time. And if there was, I would be visiting that (nonexistent) larder so frequently that there wouldn't be any left when visitors did arrive...
Mug Rugs can be any smallish size you see fit, but I've settled on 6 x 8" for mine, and that seems about right. I have some small paper piecing patterns collected from Quilters' Newsletter Magazine over the years that were perfect for this, and finally I found a way to use this sweet little trick-or-treating ghost for something as well. Isn't he cute? I think I'll keep this one for myself. Or maybe I'll make more of them. They are quick to make after all, and that's part of their charm, I think. That and the opportunity to play with design ideas on a small scale.
In fact, these mug rugs were so fun to make that I just knew I had to make more, so I gathered all my batting odds and ends, zigzagged them together and cut them to size (7 x 9, to allow for trimming). So now I have a pile of twenty something pieces lying next to my sewing machine, ready for action. Hm, I know what some of my friends will be getting for Christmas... and if there's a new swap, I'm ready! I've truly caught the bug. The fact that it's so fun to say also helps when you're silly like me: "mug rug" - just try it! :-D

Friday, September 24, 2010

Workbook revisited

A while ago I wrote (almost) weekly about the Workbook Wednesday project I participated in. As these things tend to I went into the project full of enthusiasm, but things petered out after a while, and I didn't do all the assignments in the workbook. Still, I had fun along the way and I have managed to finish all the seven little quilts I started, and have learned a lot along the way.
I chose 'Windows' as my theme, and most of the small quilts have something window-related going on. With this one, where I worked with diagonals, I made a frame to give the impression of looking out of a window. To emphasize the diagonal line, I added some flower shaped beads and a butterfly. This one has traditional single fold binding.
Here we were to play with the placement of different abstract shapes. I connected them with quilting lines and if you think it looks like some red bikini briefs hung out to dry, that was not my intention, LOL.
I added a pretty polka dot ribbon along the zigzagged edge and some aqua beads in the upper left hand corner.
The appliqué pear and shadow was the only assignment where I used a pattern from the book. I also added an orange strip along two sides to try to give the impression of a shadow from a deep frame. This one is just zig zagged around the edge. I can see that it works as a quick and easy way of finishing a small piece, but it doesn't really suit my neatnik ways. It's hard to tear oneself away from the traditional use of a neat and proper binding, I suppose.
This one just started out as a sample of strips inserted into a square of fabric and comparing the effects of ironing the seam allowances towards the strip or away from the strip to get different effects, on that makes the strips lie on top of the quilt and the second giving recessed strips. To avoid having this sample just lying around and not making itself useful, I added an extra piece of blue to make it the same size as the rest and to try out some stripy quilting. With a bit of imagination this too can be seen as a window quilt - a  tall office building  seen from a ground floor window, mirroring the sunset, perhaps... Oh well, it gave me the chance to try out the blind hem finishing effect which I'd never tried before, and that's one I might actually add to my repertoire.
I also made a sample using curved seams, and decided to use it as a background for another technique: thread painting. I put the background into an embroidery hoop, drew the outline of the bird (recognise it from the border of my blog?) with a water soluble pen and added heavy stitching to create the sulky looking bird. The next technique was bobbin drawing. I used green perle cotton in my bobbin and stitched the cage from the back of the quilt. After adding a frame and quilting, I came up with the idea of adding the cat to emphasize the impression of a window, this time looking in through one. The edge got a narrow machine stitched line and was sealed with glue before I added gold ink along the edge. This was a bit messy, but worked well for this small quilt. It's not a technique I would have used for a larger quilt, though. 
This one started out as a wonky log cabin block. With a few extra strips it ended up the same size as the rest and became a background for my couching exercise, using both hand and machine. I added an uneven blanket stitch along the edge. I still struggle with making my stitches uneven, just as I struggle with making my log cabin blocks wonky, but I'm getting better all the time ;-) After quilting a big flower and some curly swirly lines, I added some beads for that extra sparkle.

The last piece was a collage using a fabric with a motif. Heather Ross' goldfish were perfect here, and I also tried out the porthole technique, or faced opening, on the green fabric, placing a fish behind the opening. Some beads on this one as well and for the edge I zigzagged down some lengths of novelty yarn.
So there you have it. A lot of new techniques resulting in seven little quilts. Not perfect, I know, but that's hardly the point. They are finished, and that makes me happy :-)

Sunday, September 19, 2010

Birmingham fabric


Birmingham fabric
Originally uploaded by crafty mathea
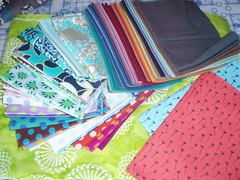
I've been sorting through the mess which is my sewing room, and had a bit of fun going through all the stuff I bought at the Festival of Quilts in Birmingham last month. I've been saying that I didn't really do a lot of shopping, but that's not entirely true, is it?
I bought some 10" squares of Amy Butler's latest fabric line and of Kaffe Fassett's polka dots and shot cottons. Some V&A reproduction fabric and some batik also went home with me plus lots of gorgeous thread.
Takings were rather good after all...
More pictures at Flickr (just click on the picture).

Thursday, September 16, 2010

How to make a purse from a tie

I promised to show how you can make a small purse from a tie. It's amazing how much fabric there really is in a tie when you unpick all the seams. This is not a very thorough tutorial, just a brief outline, so feel free to ask if anything is unclear. With no man in the house I haven't got a stash of beautiful silk ties just crying out to be used, so I just got one, rather dull one in shades of grey, from a thrift store (that was the most exciting one they had at the time - maybe men here aren't very adventurous, or they hang on to their prettiest ties, who knows...) Anyway, here goes:
There aren’t any exact measurements in this tutorial as ties vary in width, but what you need to do is to cut off the first 6” of the tie from the widest end. This can either be a pocket for your cell phone or a closure flap. Also, you need to cut off the pointy bit at the narrow end of the tie.
Measure the remaining length of tie and divide by six. This is your measurement for cutting the remaining pieces. To make sure you don’t get your pieces mixed up, label them from 1 to 6 in the order shown.

Now it’s time to get your seam ripper out. Open the seams on the back of each piece and remove any interfacing and lining fabric. Press each piece to get he creases out (careful with the heat if it’s a silk tie – a pressing cloth is a good idea here!)
Now lay the pieces out as shown (the wide end down), pieces 5-1-6 makes one side of the purse and 3-2-4 makes the other. Sew the pieces together and press seams open. You might have to trim the pieces a bit so they end up the same size. Cut two pieces of thin batting and two pieces of lining fabric using one of the sides as a template. Layer each side with batting and quilt to stabilize. I just stitched some lines on either side of the seams and a few more in between. Lay the outer right sides together and stitch down one side, across the bottom and up on the other side. Do the same with the lining, leaving an opening to turn the bag inside out when finished. Turn bag with the right side out and put it into the lining and stitch along the upper edge. Turn bag right side out through the opening in the lining.

If you want to use the piece you cut off from the end of the tie as a pocket, you can stitch it to one side of the purse, like I have done (see the first picture), before you stitch the pieces together. If you prefer to use it as a strap to close the purse, you will need to attach it as you stitch the seam around the opening. You can use your purse as a clutch purse, or if you prefer a strap, you can make it from matching fabric or use a cheep pearl necklace, like I have done. Embellish to your heart’s content and enjoy!

Sunday, September 05, 2010

Festival of Quilts

OK, so I promised to share more about my visit to the Festival of Quilts in Birmingham (UK). Now where to begin? I realize that my photos can't really do the quilts enough justice, and there were so many, that I only managed to photograph a small percentage of them. There were beautiful traditional quilts and wonderful art quilts and everything in between, so what I share here are just a few glimpses of things that caught my eye. The information about the quilts is from the show catalogue.

First out is this one by Annette Morgan, called "Pay the Ferryman" including image transfers, screen printing, foils and paint. I was not surprised that it won the Art Quilt category.
Here's a closer look.

This 3 D quilt which includes felt and batting which has been shrunk to distort is the winner of the Contemporary Quilts category. It is called "Squaring Up" and is made by C. June Barnes.
Here's a closer look. I had to clasp my hands behind my back to avoid reaching out to touch and try to discover how it had been made ;-)

"A Future and a Hope" by Lynne Quinn was just amazing. It is her City & Guilds final quilt and includes a "storm at sea" pathway and "light" to shine the way.
"Rainbow Colours" by Kathy Unwin.

Nina Lise Moen made this winning entry for the Quilters' Guild Challenge "Summer in the City".

This quilt by Rosalind Gregory and Joan Herrington is called "Where have all my shirts gone?" and is made from recycled shirts. Inspired by Taunton's lost shirt factories, red braces and citiscapes.

I find myself drawn to quilts with buildings on them, whether they are homes, cityscapes or industrial plants, modern or historical, I'm always drawn in. Here's another one, "A New Leaf" made by a group of four called Fusion.

Alicia Merrett's "Mapping Earth" falls right into the same category. She had a similar, larger version, in the Art Quilts group as well.

I was amazed to learn that this one was made by a young quilter, Harry Lyons, age group 9-11! I wouldn't mind having this on my wall :-)

Among the stunning work displayed was also this one made of Kaleidoscope blocks. The maker, Solvi L. Krokeide, calls this "Life in a Kaleidoscopic World". It was originally made for a Norwegian contest themed Lonesome, Twosome, Threesome"

Ferret has made another magnificent quilt. It is called "Phoenix Rising" and includes stunning feather quilting. I have noticed her work at previous festivals and you her blog is really worth checking out.

The miniature section had quite a few stunners as well. This tiny gem "Bluer than Blue" by Betty Ball can't have been more than 7 x7 " - makes you wonder what she has done with the seam allowances!

Some fun and colourful pieces to round off this little tour of the festival. This is "A Rose Garden" by Hiroko Fukawa. It consist of square in square blocks of different sizes, quilted circles attached to the edges and lots of tiny yo-yos scattered around. Really fun and whimsical!

I finish with a detail of Ylva Ugerup's quilt "Fly out Swedish Ladies!" from her series of quilts where she portrays women who have made an impact on the world. I don't know enough about Swedish history to tell you who these two are, unfortunately, but I love all the details and handstitching in her work.