Sunday, August 08, 2010

Gothic Tote

As this seems to be more of a Look-what-I-made-blog, then one about my everyday life, here's something I've made! I needed a big tote for my holiday and have had this pattern, Anna Maria Horner's Multi Tasker Tote, in wait for quite some time. I first spotted the bag on Anna Maria's blog before the pattern was published, and was lying in wait for it to becom available, and ordered it as soon as it was, so why has it taken me so long to actually make it? Well, I quickly realized that I didn't have any fabric I could use as I usually buy only half-yards, except for backing fabric for quilts. This pattern called for one yard of the outer fabric and two yards of  lining fabric. I have always loved Jane Sassaman's fabrics, and I knew that their large scale would be perfect for this bag. When I discovered that her Prairie Gothic line was available in home dec weight, even better for a sturdy bag.
Having tried to get to grips with the construction of the bag by just reading the pattern, I was a bit confused as to how it would all come together, and as I didn't refer to the pattern while ordering my fabric, I got it wrong and ordered two yards of the outside fabric and one yard of the lining fabric instead of the other way around, so when I finally got round to cutting it, I had to do some quick thinking. I ended up with cutting the pocket panels from the same fabric as the outer panels, and just using the lining fabric on the inside. You can only see some of it where it is folded over at the top on the sides of the bag. This doesn't make the pockets stand out as much as they were supposed to, but the bag is still nice enough I think. I'll just have to remember this the next time! 

The lining fabric is the same as on the outside but in a different colourway - much easier to find things inside, that way! Since I only had one yard of the lining fabric, I had to stich an extention to one of the pieces, so the pattern  of the fabric doesn't quite add up inside, but who's to know? Only you ;-)

To add a bit of extra colour, I used some purple Flora and Fauna with bees on the underside of the straps, keeping to the theme of bugs from the other fabrics.

Having mentioned that I was a bit confused by the pattern initially, I must add that once I started cutting and sewing, the instructions were very clear, everything went together very well, and I had no problems in actually making it. Some things you just have to see and do in order to understand. So I will definitely make this one again. It's a big and roomy bag with wide comfortable straps, four outside pockets and one inside (which I divided in two - making a separate compartment for my cell phone) - perfect for my holiday shopping jaunts I should think!

Saturday, August 07, 2010

The blue quilt

Another finish. Actually this quilt has been finished for a while, but it is such a long quilt that I have been struggling to find a way to photograph it indoors and yet show the whole thing.
The idea for this quilt began while I was sorting through my stash last winter and realized that I had an awful lot of blue fabric that never seems to go with anything. I had amassed a lot of fabric with planets, stars and clouds while planning the Space Quilt and the Kite Quilt for two of my nephews, but as they never were used there, they just stayed on in my stash. When visiting my sister on a cold winter's day and seing my 13 3/4 nephew trying to cuddle up under a tiny knitted afghan, I realized that he has outgrown the quilt I gave him some years ago. I totally get that cats, bats and toads might be a bit uncool when you're almost 14 and your friends come around! So, the idea of a new quilt was planted. The colours of his favourite sports team are blue and orange, so my blues could be put to good use. I purchased a length of orange polar fleece (I asked for two meters, but it turned out to be 2,2 meters) and used that as a size guide. I pieced the smaller scraps randomly together into blocks of different sizes, cut some of them up and kept some, adding strips of different widths, and whole lengths of fabric in some instances I also dipped into my favourite blue fabrics to bring it all together. It was all very haphazard, but I enjoyed the process. Eventually I ended up with ten full-length strips and stitched them together.
The quilting is very simple  - just some horisontal lines of variegated red/orange thread to hold it all together. And there you go: I've got room for more blue fabric in my stash and my nephew will have something to keep him warm through next winter. A win, win situation, wouldn't you say?

Monday, August 02, 2010

Hang ups

I was trying out my new hanging system to photograph this quilt. It's needs a bit of improvement, but at least I know where I'm going with this. I got a friend of mine to buy a curtain wire from IKEA. It is similar to a photo wire, which is what I really wanted. The curtain wire is meant to be stretched between opposing walls, and should be completely taut. Since I needed a shorter piece of wire to stretch above a sliding door, however, I couldn't get the wire taut enough, because the wall fastening bits had to be bent at a 90 degree angle. A photo wire has different wall fastenings which allows for tautening even if it is stretched accross a shorter stretch of wall, so I'll have to look for one of those. 
The wire is placed at the top of the wall and therefore rather discreet so it can hang there permanently. There are little clips to use for attatching the quilt and let it hang straight down. If I push the sofa away, I get enough space to take a picture of the whole quilt. As you can see, it sags a bit, but with the right wall fastenings I think I can make this work and make it easier to photograph quilts in winter (or when it's raining during the summer, which seems tobe most of the time...), when I have to do it indoors.  

Saturday, July 31, 2010

Phinished and photographed

Here it is, the quilt I've been working on lately. I started out with a "Designer Roll" of Erin McMorris fabric (like a Jelly Roll, but not from Moda, so they're not allowed to call it that, I suppose...). I also had some yardage of that lovely tree fabric, but not enough, so I added a couple of other cream fabrics. One of them is showing up as very white in the photos, but the contrast isn't quite that bad in real life. The pattern is from Quilt Sampler Magazine, only I made it a bit smaller.

I used a cheap, textured fleece blanket for the backing. The stripy effect shows through to the front, and I'm not quite sure I like it. I also had a lot of problems when quilting it, with the thread breaking, especially in the border, and I'm told that this often is the case with cheap fleece, so it pays to go for better quality, I suppose. It was a question of using what I could get locally this time, and I loved the colour, so I went with it, in order to get it finished. I made this for my sister who had to have surgery recently (Thankfully everything went well and she's on the mend). It served as a way of keeping my self occupied while worrying about her, and now, finished, it will be a reminder to her that it is OK to slow down and take a nap now and again.

I used the offcut corners from the snowball blocks to make some flying geese and with some borders made from the scraps I had a cushion to go with it as well. These are really fast to make and so easy, I wonder why I don't do it more often. I used a turquoise binding as I was all out of purple, but I think it works OK. It probably helps that it is my favourite colour...
So there it is, a little surprise gift for my sis, with love in every stitch, and I'm ready for my next project: a new bag for myself - because we all know that I need another one, right?

Monday, July 26, 2010

Something's going on...

I've been a lazy blogger lately, while spending time with family and keeping my sewing machine company.. Now for miles of purple binding and I'll have something new to talk about!

Monday, July 12, 2010

Meet my thread stash

Sew, Mama Sew are inviting us to show off our thread stash, so here goes!
I have been quilting for years, and have amassed a lot of this thread over the years. I mainly use neutrals for piecing (ecru, white, black, grey and tan) and stock up on these whenever I come across a good deal. I still have a lot of hand quilting thread from when I first started out, but rarely use it these days.
For machine quilting I use a lot of rayon, but I buy interesting thread whenever I see something I want to try, so I have sliver thread, metallics, cotton, linen - you name it... I also have a lot of cotton floss ( I used to do a lot of cross-stitch) and sometimes use that or perle cotton for hand quilting and embroidery.

I don't always match the colour perfectly to my projects. For backgrounds and large areas I generally go for matching thread, but if I sew a motif that I want to stand out, I might use a contrasting thread, or if there are lots of colours and I'm doing an allover pattern, I usually go for something that goes with all the colours, maybe some varigated thread. I prefer to use the same colour in the bobbin, but I often choose cotton thread if I'm using rayon for quilting.
I store my thread in these little drawer units from IKEA. They keep it dust free, and if I'm doing some kind of machine embroidery or something which involves a lot of colour changes, I can just pull out a drawer or two and bring them over to my sewing table for a little rummage. I have them sorted by colour and type of thread, so it is relatively easy to remember which drawer to look in.

My floss is stored in precut lengths threaded onto cardboard strips sorted by numbers. I keep them in a storage container (also IKEA) and have room left over for a plastic bag with bits and pieces left over from other projects.

I have some single skeins of silk and linen thread in there as well. These are precut and braided so they don't tangle. It's easy to pull a single thread from the braid when I need it.

For embroidery I also have some of these sweet little tins with magnetic lids. The each hold one ball of perle cotton, and the end can be threaded out through the hole in the lid and onto a needle. The magnet holds the needle in place for whenever I need it.

So there you go - I seem to have lots of thread, but I'm always on the lookout for more - how can you quilt without thread, after all ;-)

Saturday, July 10, 2010

New quilt on the go

I have so many ongoing projects that I thought I might just as well start another one... I've had this Design Roll waiting patiently for me to come up with the right pattern for quite a while. It's from the Wildwood Fabric collection by Erin Mc Morris. Luckily I also bought some yardage of her sweet tree fabric from the same line, so I had a bit more to play with.
I bought the latest issue of Quilt Sampler recently, although I had told myself last time that I wouldn't bother with this publication anymore. I've enjoyed this magazine and the "visits" to different quilt shops for years, but I'm not all that happy about the changes in recent issues. There used to be lots more photos from each shop, and I'd spend hours taking in all the details, often getting ideas from colour combinations and quilts on walls just as much as from the featured patterns, but now they point you to their website for more photos. That's all very well, but to me, buying magazines is all about curling up on the sofa or in bed to browse at leisure, and I for one don't bring my computer to bed, so being able to see extra material online just isn't the same. Oh well, enough ranting there. I did find a pattern I liked anyway, so I shouldn't moan so much ;-)
I've managed to stitch all the blocks today in between bursts of housework. So in fact my home is pretty clean and tidy as well, leaving more room for sewing tomorrow - yay!
I wanted a lilac fleece backing for this one, to go with the purple triangles (Kaffe Fassett's Aboriginal Dots),  but couldn't find one in town. A quick online search and I found one shop that just might have what I needed, so I jumped on a bus after work yesterday and went to the mall on the outskirts of our town, rushed across a vast parking lot, took the lift to the right floor, burst into the shop and spotted the blanket I wanted right inside the door, grabbed one, paid hurriedly for it (and it was half price, yay!) and rushed back and caught the same bus back to town. Efficient shopping! :-D

Friday, July 09, 2010

Plans

Remember this? Inspired by this I have actually convinced myself to remove that ribbon and have started cutting those strips into pieces. More tomorrow...

Wednesday, June 23, 2010

Not completely by the book


It's Workbook Wednesday again, and I must admit I have been slacking off a bit here. There has just been so much going on, and then the next chapter in the book was all about fabric painting, stamping and so on. And I just didn't feel like it, you know. Sometimes that's just the way it is.  Messing about with paints is not where I'm at right now. And there was this bit of playing with metal foil, but no matter how much I tidied up, I just couldn't find that packet of foil I know I have somewhere. - Actually I just realized: it's probably in the box with the fabric paint, that I haven't looked at for ages, duh!
So, what's a girl to do? I've been dragging my feet a bit, but today I just skipped a few chapters, and got on with it - thread painting seemed so much more interesting at the moment. So that's what I did.
My twitter-friend in the margin here was happy to model for me, I hooped my fabric and started playing. And you know what? It was fun! Not the most perfect of little birds, I know, but I bet you could see that it was meant to be a bird, anyway...
I have done a bit of thread painting before, and the funny thing is that this time, when I was following instructions, I did what I normally wouldn't have done: I hooped the fabric without using tear-away or water soluble foundation. And you know what happens, right? There was a little voice telling me in the back of my head - "the fabric will pucker, the fabric will pucker..." and it did. But not too much, though - I will probably be able to straighten it out a bit when I quilt it. Never mind, this is supposed to be a learning experience, right?
Next I'll be trying bobbin drawing, something I've been wanting to try out for a while - I've even bought that extra bobbin case so I can fiddle with the bobbin tension to my heart's content, so it's about time I got round to it.
But not tonight - I have the two final episodes of Lost to watch, so I'm taking the phone off the hook and settling down in front of the TV. Completely Lost ;-)

Monday, June 21, 2010

Random

My sister's lilac tree tells me that it really is summer, though the temperature doesn't seem to agree...
Lot's of things to do indoors, though:
-Like hand quilting between these lines...

... binding to stitch, books to study...
...and interesting yarn (or ribbon?) to play with.

Sunday, June 13, 2010

Authentic 2x4 finished

I've been away for a few days, and managed to finish my Authentic 2x4 sampler just before I left, but had to wait until today to get a decent photo of it. I see now that I should have taken the time to prep it a bit more because the edges look all wobbly, but they are perfectly straight, actually (she says smugly ...). Never mind, here it is anyway.

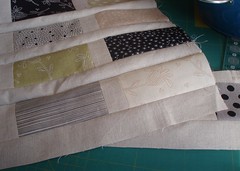
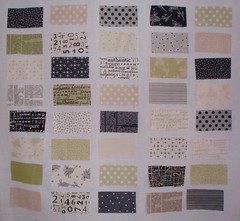
I used linen for the binding to keep it simple, because it's the 2x4 patches from the Authentic fabric collection that are the stars here. I cut a 4 1/2" piece of each strip from the Jelly Roll, 40 pieces in all, and used 1" sashing and borders, resulting in a 25 x 26" wall quilt. The quilting is done in straight(ish) horizontal lines. I just let the presser foot follow the seams, and added a parallel line the same width away from that. I chose not to stitch in the ditch, because I never seem to be able to make that look very good, and so to create some sort of rhythm, I decided against stitching a line through the middle of the patches. So I ended up with a pattern of two close lines, a wider space, two close lines and so on. (Very interesting I'm sure...).
I've had this piece of curtain fabric in my stash for ages. When it arrived I realized that the writing was too big for it to work in a quilt and the weave was too loose for a bag. It proved to be just the right thing for the back of this quilt, though, which just goes to show that I've been right to build a large stash, and that no purchases are mistakes, they are just waiting for the right opportunity to make themselves useful ;-) Will that explanation hold up in court, I wonder? Can I go shop for more fabric now? :-D
I will try to find some more of that fine linen, at least, because that had just the right weight to complement the cotton fabrics. Linen I have come across locally has just been too coarse and slippery, I think. Now, if only I could remember where I bought it...

Wednesday, June 02, 2010

Wednesday again


collage
Originally uploaded by crafty mathea
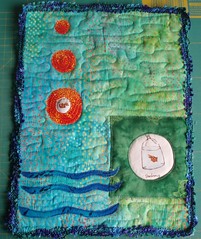
Just enough time before I rush off to blog about this: it's Workbook Wednesday again, and I managed to get round to creating a collage using a focus fabric. I chose the goldfish one (Heather Ross, I believe), and started playing with pieces of it on a suitably watery background and was thinking of adding more marine life when I remembered that my theme for this series is supposed to be "windows". Now I might stray from this from time to time (I tend not to follow rules for very long, even if they are my own...), but I chose to add one here, a round one, so I suppose it is a porthole really. I used some suitably seaweedy yarn around the edges, and there you have it - a fishy collage :-)

Monday, May 31, 2010

Authentic 2x4

I finished quilting my Authentic 2x4 quilt today. The name is just a silly little play on the fact that my patches are 2 x 4" and all the fabrics are from the Authentic fabric line - I just cut one piece from each strip in my Jelly Roll. Now I had thought I'd stick with the linen for the binding as well, but is that too boring? Should I use a black and white, for instance?

I'll enjoy some freshly baked cookies and a bit of Miss Marple, and decide tomorrow...

Saturday, May 29, 2010

Coming along nicely


Coming along nicely
Originally uploaded by crafty mathea
My Authentic sampler is coming among nicely. I'm glad I went with the linen - it goes well with all the fabrics, I think.

Wednesday, May 26, 2010

Wonky Wednesday

It's Workbook Wednesday again and I took the opportunity to do a bit of wonky piecing - yes, I have cheated a bit and skipped a few exercises and dived into chapter 5. That seemed just right for today, but I will go back and do the collage and the photo inspired piece, I just need to mull it over a while longer.
So today I did some curved piecing - I have tried that before, but it is always good to get some excercise in, right? I also did a piece with inset strips, and last, but not least, this wonky log cabin. Well, that's what I started making, but I don't know: there's something about me and log cabin - I have trouble sticking to it for long... It's all that pressing and trimming along the way, I think. And because I insist on keeping my ironing board in another room in order to get up from the sewing machine ever so often, working on just the one log cabin block means that there is more walking than sewing. So I called it a day when the block was just over 9 " and added a few wonky strips at the bottom so I ended up with a 9 x 12" piece. Maybe I can use it as a background for one of the quilts in this series? It's been a while since I did any wonky piecing, though, so that was fun. And as usual I'm ending up with lots of new ideas for things to make, and that's part of the fun, isn't it?

Now have a look in the Workbook Wednesday pool and see what Lisa and the others are up to.

Monday, May 24, 2010

Sampler


Sampler
Originally uploaded by crafty mathea
I bought a Jelly Roll of Authentic by Sweetwater a while back, and thought I'd use bits and pieces of it in collages and whatever. I just love fabric with words printed on them, and this line has several of those. As it often is with these things, I found myself reluctant to start cutting into it, but I wanted to "get to know" all the different fabrics, and while reading Jane Brocket's new quilt book and what had inspired her to make her sampler quilt, it dawned on me that I could make a sampler of my own. I worked it out in EQ, and decided that if I cut the pieces 4 1/2" for a finished size of 2 x 4" and used 1" sashing, I would end up with an almost square quilt when I chose a layout of 5 by 8 blocks. Once I finished stitching the blue top together this morning, (more about that later) I got to work, cutting my pieces and getting them up on my design wall (which is just a fancy term for a flannel sheet with grommets in two corners hung from two hooks at the top of my wall!).
I've been moving them about for a while, and I quite like the layout, but now the big question is: what colour sashing should I choose? Initially I thought some sort of neutral like bone, cream or grey would be good, but some of the fabrics might get lost by blending into the background too much, I think. I have a solid bright blue which goes well with all of the colours, but it might be too dark. Any suggestions?

Saturday, May 22, 2010

Bloggers' Quilt Festival

I thought I’d share my Amy quilt for Amy’s quilt festival ;-)
The name refers to a different Amy though – Amy Butler - and the quilt is made entirely from her fabric line Ginger Bliss. I usually name my quilts, but his one has just remained my ”Amy Butler quilt” all along, not getting a name of it’s own. This is one of the first big quilts I have made that I kept for myself, and I don’t think I could bear to part with it, to tell you the truth. Just looking at it gives me a happy feeling.


I first became aware of this fabric line when it was on its way out, being replaced by her next one, and supplies were dwindling in the shops. I was bowled over and ended up on a mad shopping spree, buying pieces of all designs and colourways I could find on different websites around the world. After a few hectic weeks I had amassed a sizeable pile of fabric and just knew I wanted to include all prints in one quilt, and that to give the fabric the starring role, it would have to be a quilt in a simple design. I found one I liked in this book, a simple four-patch design with large squares. This was quite a departure from the way I had been working up till that point – no templates or intricate blocks, just speedy cutting and stitching together. Until then I had also made it a point to mix fabric from different lines, and come up with my own combos.

There was just something about these fabrics that told me they had to be together. And to tell you the truth, there weren’t all that many fabrics in my stash that would have gone well with these, as most of my fabric until then was very bright or saturated. I did think that Kaffe Fassett’s Lotus Flower print in pastel might work as a companion, and ended up using that as a border on the pieced backing. Yes, there’s a pieced backing too – the first time I went down that road as well (a lot of firsts here!). I wanted to use as much of the fabric as I could in one quilt, having bought so much of it, and I had also wanted to try the “stack and slash” method, so that’s what I did for the backing. The quilt is heavily quilted in a spiralling rose pattern with light pink rayon thread, emphasizing the floral theme. I finished it off with a teal binding fabric.
So what is it about these fabrics and this quilt that I love so much? I know there is a childhood memory in there, but I’m a bit fuzzy about the details. It all has to do with my grandparents’ big trip to Italy when I was four. I still remember the day they came home. It was a big event, and the whole family went to the station to meet them. I seem to remember my grandmother in a new floral dress, and this being the late sixties; there might have been a resemblance to this in the retro style of the fabrics in my quilt. I also remember being given a wonderful pink straw hat, which was put on my head right there, at the station, so they must have been carrying it in their hand luggage, eagerly waiting to give it to me. There was such a happy feeling to that day that it has stuck in my memory. Part of it was being reunited with my lovely grandparents (they lived in the same house, so I was used to seeing them every day). Come to think of it, this was also probably their first holiday abroad together – my grandfather was in the merchant navy, so when he came home, they preferred going to their house in the country on my grandmother’s time off. They had apparently had a very good time, because I remember them as being very happy and almost radiant – maybe it was like their second honeymoon (or actually their first, since they were thrown straight into a demanding everyday life when they married in 1928). My grandmother’s taste in fabric and colour sense might be part of the mix too. As I said, I can’t pinpoint the exact thing, but somehow, looking at this quilt evokes memories of glorious summer days, my grandparents and Italy. Italy has always seemed like a magical place to me, and I have visited the country several times, and the fabric also reminds of these trips. Hm, I’ve just thought of a name for it – I think I’ll call this my Italian Bliss quilt, now how about that?

PS. That same day at the station also inspired another little project – it must have been an awesome day…

Friday, May 21, 2010

On my wall

I haven't been doing much stitching lately, but when I have, here's a glimpse of what I have been working on.
On one of my visits with my sister and my nephew (aged 13 3/4) this winter I found him huddling under a much too small knitted blankie in the evening. I didn't comment, but realized that the quilt I made for him some years ago has become too childish for a young man - not very cool when friends come by, you know! This has been in the back of my mind for a while, and I decided to make him a quick utility blanket - a pieced top lined with fleece. I came across some orange fleece, and decided on a colour scheme of blue and orange - the colours of his favourite sports team. I started pulling blue fabric pieces from my stash and managed to assemble a sizeable stack from my ever growing stash of blues. Originally I had thought I'd make a top from 8 " squares, but I realized that there were too many skinny strips, jagged edges and akward shapes among the pieces I had assembled to do so. After mulling this over for a while I just started stitching the pieces I had together into larger pieces and then into strips of varying widths. I have made enough strips to cover the 60x80" piece of fleece now, and have started stitching them together.
I'm not entirely sure I like the effect yet, but we'll see what happens once I get them all together and can look at it from a distance. Maybe it will work?
At least it will keep a young man warm and cosy on chilly evenings, unless that too is uncool - you never know these days... ;-) 13 3/4 is a seriously challenging age!

Friday, May 07, 2010

Wednesday on a Friday

I know, it's called Workbook Wednesday, and today is Friday, but it's been a crazy week. I managed to upload these pictures to Flickr before I went to bed on Wednesday, but that was it.

I have quilted the two small quilts I showed last time. The first one is the one where I played with different shapes, and placed them in different relations to each other. I couldn't decide, and eventually I just slapped them down with the iron. The red piece reminded me of a sail, and I quilted lines connecting it to the other two pieces. Now when I look at it, it looks more like a pair of bikini bottoms hanging on the washing line... ;-D The quilt also looks a bit plain and "open", but I'm just leaving it as it is until I get to the chapter about embellishments and finishing techniques and we'll see what I come up with...

I trimmed the pear piece and added some borders before quilting. This one also needs some kind of binding or edge finish, but I'm leaving that for later as well. I'm quite happy with it so far, though.

Sunday, May 02, 2010

Do you EQ?

I have found the computer programme Electric Quilt a great help for designing quilts since I bought my EQ4 ten years ago. I've used it, and later versions to plan my quilts, decide on sizes of blocks and borders, colour choices and much more. And of course I design all sorts of fanciful quilts I know I'll never actually get round to make, but that's half the fun. Much better than any computer game, if you ask me!

Different stages of my kite quilt in EQ - see the final version here.
I'm working with EQ6 now, and wouldn't you know it - they are releasing a new version, EQ7, just to tempt me into another upgrade. My first thought was that I'm fine with what I have, but one look at all these new features, and I must admit I'm tempted...

Different versions of my X-block quilt in EQ - see the finished quilt here.